Back to the list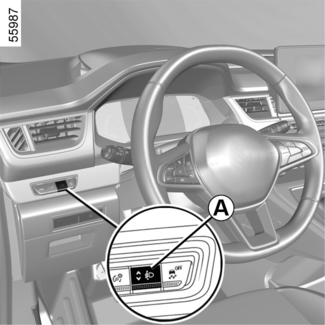

Headlight beam adjustment
Headlight beam adjustment
Switch A is used to adjust the height of the headlight beams according to the load.
With the dipped beam headlights on, press or raise switch A as many times as required to select the required position on the instrument panel.
Note: depending on the vehicle, when the engine is started, the position selected is displayed
on the instrument panel for approximately 30 seconds and for five seconds each time
switch A is pressed.
Adjustment position examples
Examples of positions for adjusting the control A according to the load | |||||
Van version | Estate versions | ||||
Standard chassis | Long chassis | Standard chassis | Long chassis (5-seater) | Long chassis (7-seater) | |
Driver alone or with front passenger | 0 | 0 | 0 | 0 | 0 |
All seats occupied | - | - | 1 | 0 | 1 |
Driver with passengers and luggage (or load) reaching the maximum permissible all-up
weight | - | - | 2 | 1 | 2 |
Driver without passengers and luggage (or load) reaching the maximum permissible all-up
weight | 4 | 4 | 3 | 2 | 3 |
The table below gives some examples. In all cases, adjust the control A according to the vehicle load so that the road can be seen and other drivers are
not dazzled.
| |||||
Temporary adjustment
Tip
When driving on the left in a left-hand drive vehicle (or vice versa), you must adjust
your lights temporarily during your stay.
The adjustment must be carried out manually.
Press or raise the switch A as many times as required to select position 0 on the instrument panel.
Open the bonnet and identify the marking B next to one of the front headlight projectors.
Operating principle
Using a screwdriver or similar tool, turn the bolt 1 a half turn towards the "˗" mark to lower the beams.
Return to the original position once your trip is over: turn the bolt 1 a half turn towards the "+" mark to raise the beams.