Rear seats: functions
Rear seats: functions
Long chassis version
Second row rear seats
The rear seats are separate seats.
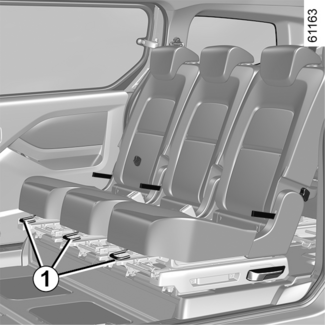
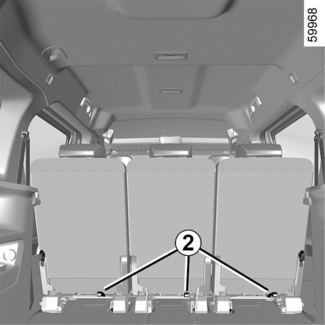
To move the seats forwards or backwards
Raise the lever 1 or pull the black strap 2 from behind the seat to unlock the seat.
Once in the desired position, release the lever 1 or the strap 2 and check that the seat is correctly locked to the floor.
WARNING
For safety reasons, carry out any adjustments while the vehicle is stationary.
WARNING
When moving the rear seats, ensure that nothing obstructs the anchorage points (passenger's
arm or leg, a pet, gravel, cloth, toys, etc.).
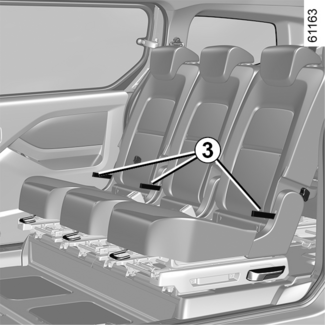
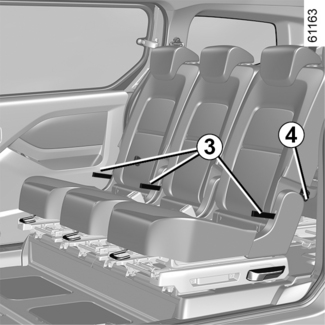
To tilt the seatback
(comfort position)
Pull the strap 3 to unlock the seatback and tilt it to the desired position (three possible positions).
When in the desired position, release the strap 3 and ensure that the seatback is fully locked into position.
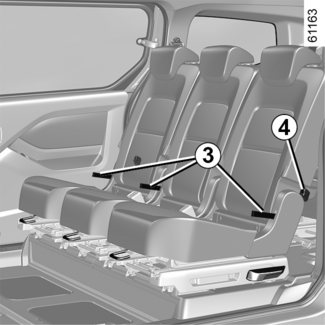
To fold down a seatback (table position)
- Lower the headrest as far as it will go;
- pull the strap 3 or push the handle 4 from behind the side seat to unlock the seatback;
- fold down the seatback and release the strap 3 or the handle 4;
- make sure you lock the seat back in place.

WARNING
To avoid all risk of injury, ensure that nobody is in the proximity of the moving
parts.

Enable the table position by folding the seatback all the way down onto the seat base
(movement A).
The seats can hold up to 80 kg in this position.
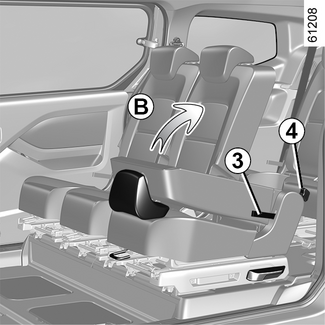
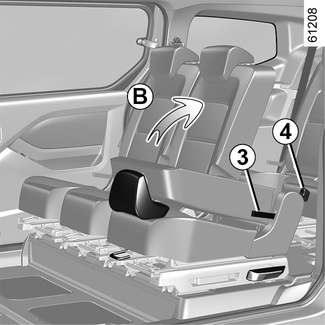
To raise the seatback
(table position)
- Pull the strap 3 or push the handle 4 to unlock the seatback;
- hold the seatback and raise it (movement B);
- Check that it is correctly locked in place.
WARNING
When refitting the seatback, make sure it is correctly locked in place.
If seat covers are fitted, make sure these do not prevent the seatback latch from locking in.
Make sure that the seat belts are positioned correctly.
Reposition the headrests.
Folding up a seat
(folded position)
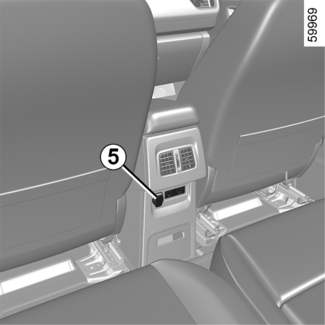
- Bring the front seats forward;
- make sure that no devices are connected to the accessories socket 5;
- lower the headrest as far as it will go;
- move the seat as far back as possible towards the rear of the vehicle;
- fold down the seatback in the table position (movement A) by pulling on the strap 3 or by pushing the handle 4;
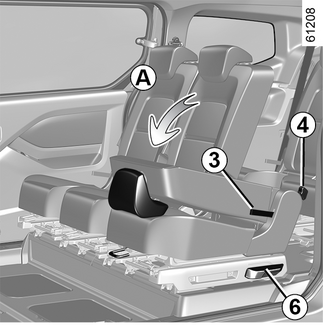
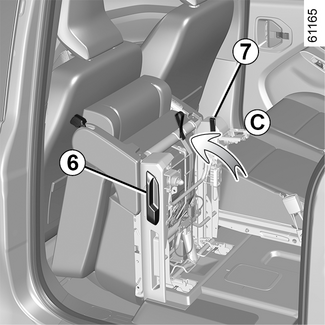
- raise the handle 6 as far as it will go to unlock the seat, or pull the red strap 7 from behind the seat if you are sitting in a third-row seat;
- lift and guide the seat until it is positioned vertically (movement C) in the folded position.

Restriction of use
WARNING
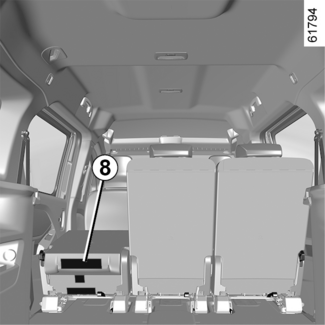
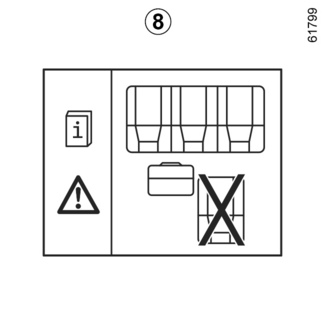
It is not permitted to drive with a seat folded down if a passenger is in another
seat in the same row.
The label 8 located on the back of the seats reminds you of this.
Risk of injury.
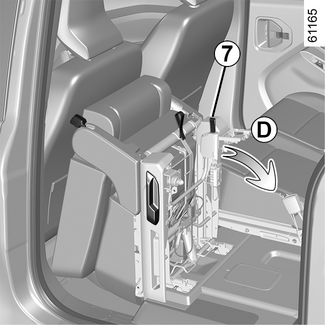
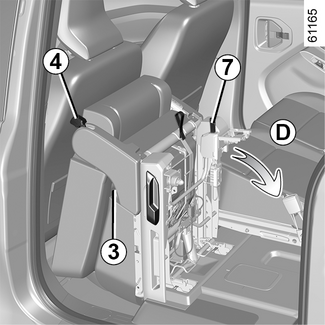
To reposition the seat
- Pull the red strap 7 upwards as far as it will go and lower the seat until it locks onto the floor (movement D);
- make sure that the seat is locked securely to the floor;
- raise the seatback (movement B) by pulling the strap 3 or by pushing the handle 4.
Third row rear seats

Accessing the third-row rear seats
- Move the second-row rear seat as far back as possible;
- lower the seat headrest as far as it will go;
- fold down the seatback (movement A);
- raise the handle 6 as far as it will go to unlock the seat;

- raise and guide the seat to the vertical position (movement C);
- Sit in the third-row rear seat.
To return the second-row seat to its original position:
- pull the red strap 7 as far as it will go to return the seat to the table position (movement D);
- make sure that the seat is locked securely to the floor;
- raise the seatback by pulling the strap 3 or by pushing the handle 4.
When handling the seats, please guide them through the full movement.

Restriction of use
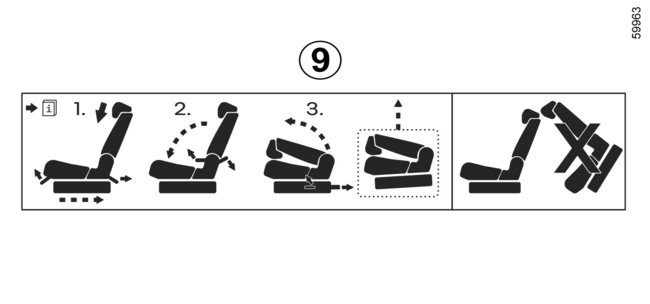
Tip
Before moving a second-row seat forwards, ensure that the seat is in the table position.
The label 9 located on the back of the seats reminds you of this.
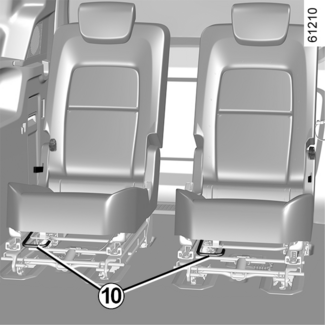
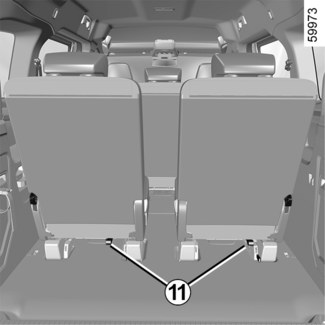
To move the seats forwards or backwards
Raise the lever 10 or pull the black strap 11 from behind the seat to unlock the seat.
Once in the desired position, release the lever 10 or the black strap 11 and check that the seat is correctly locked to the floor.

WARNING
When moving third-row rear seats:
- check that nobody is near any of the moving parts;
- check that there is sufficient space around the seat;
- check that nothing is obstructing the section of the boot reserved for storing the seat.
For safety reasons, carry out any adjustments when the vehicle is stationary.
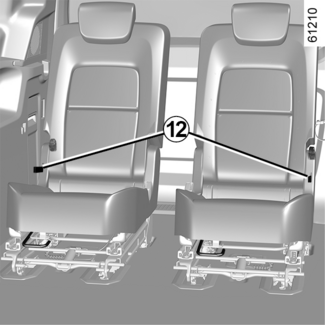
To tilt the seatback
(comfort position)
Pull the strap 12 to unlock the seatback and tilt it to the desired position (three possible positions).
When in the desired position, release the strap 12 and ensure that the seatback is fully locked into position.

To fold down a seatback (table position)
- Lower the headrest as far as it will go;
- pull the strap 12 or push the handle 13 from behind the seat to unlock the seatback;
- fold down the seatback and release the strap 12 or the handle 13;
- make sure you lock the seat back in place.

WARNING
Make sure that the seatback is correctly locked. If necessary, remove any obstacles
behind the seats. Repeat the procedure until the seat is correctly locked.
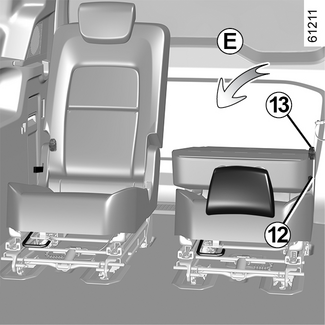
Enable the table position by folding the seatback all the way down onto the seat base
(movement E).
The seats can hold up to 80 kg in this position.
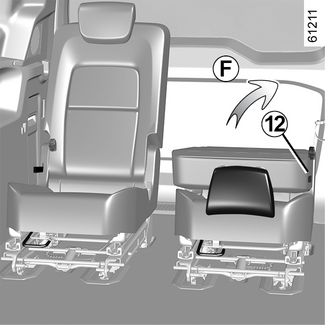
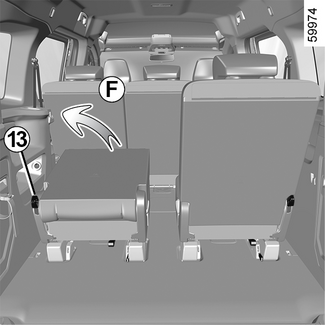
To raise the seatback
(table position)
- Pull the strap 12 or push the handle 13 to unlock the seatback;
- hold the seatback and raise it (movement F);
- Check that it is correctly locked in place.
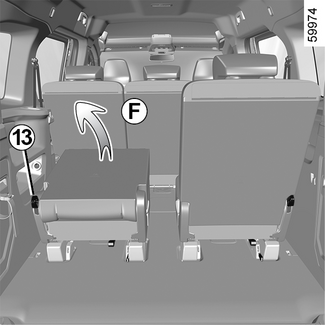
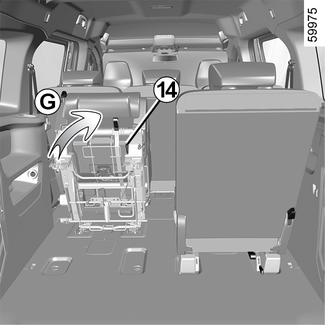
Folding up a seat
(folded position)
- Move the second-row seats forwards as far as possible;
- lower the headrest as far as it will go;
- move the seat as far back as possible towards the rear of the vehicle using the black strap 11;
- fold down the seatback to the table position (movement E) using the handle 13;
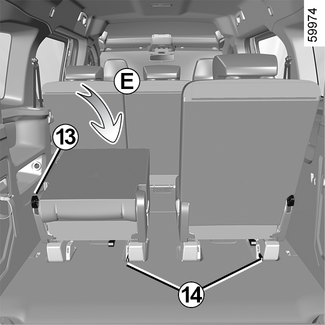
- pull the red strap 14 from behind the seat to unlock it;
- raise and guide the seat until it is positioned vertically (movement C) in the folded position.
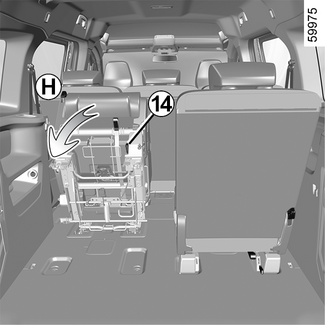
To reposition the seat
- Pull the red strap 14 as far as it will go and lower the seat (movement H) until it locks onto the floor;
- make sure the seat is correctly locked in position;
- raise the seatback (movement F) by pushing the handle 13.
WARNING
No person or animal should be on the third row rear seats if the luggage compartment
cover is not removed.
Restriction of use
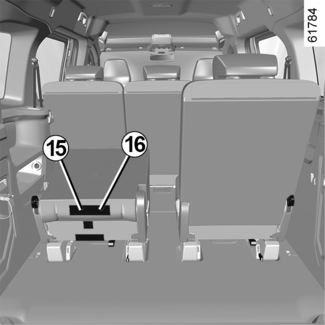
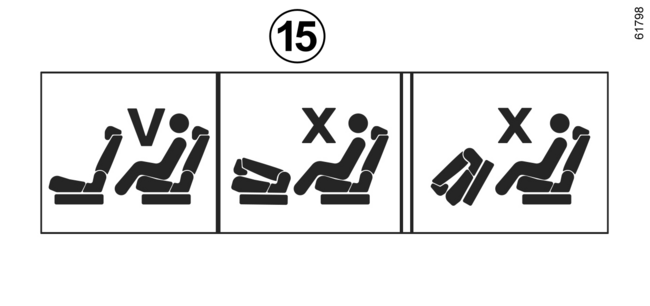
WARNING
It is not permitted to drive with one of the seat backs or a second row seat folded
down if a passenger is in one of the third row seats.
The label 15 located on the back of the seats reminds you of this.
Risk of injury.
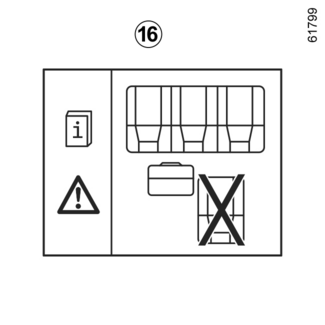
WARNING
It is not permitted to drive with a seat folded down if a passenger is in another
seat in the same row.
The label 16 located on the back of the seats reminds you of this.
Risk of injury.
Second-row and third-row rear seats
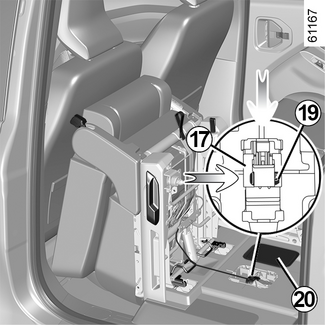
To remove the seats
The second-row and third-row seats can be removed for transporting bulky objects.
They are fitted with a connector to indicate the presence of the seat in the vehicle
and/or the presence of a passenger on the seat and their seat belt status SEAT BELTS.
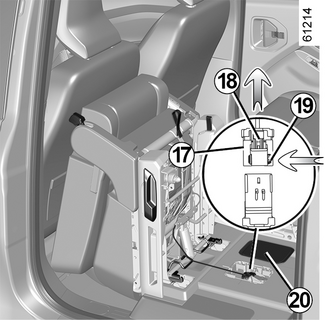
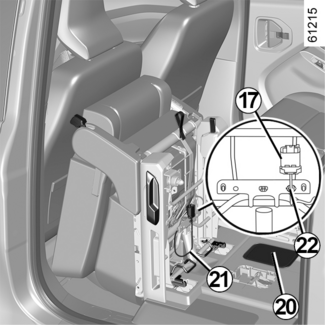
- Fold the seat to the folded position and remove the flap 20;
- disconnect the connector 17 by moving the red tab 19;
- press the area 18 around the connector and pull it at the same time to disconnect it;
- disconnect properly by holding the connector, without pulling the cable 21;
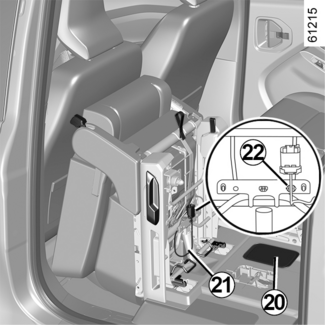
- attach the connector cable 21 to the clip 22;
- refit the flap 20.
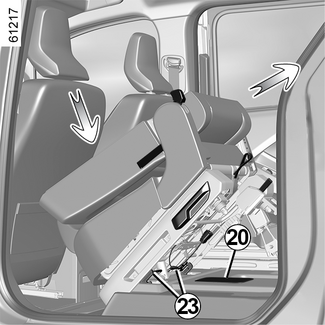
To remove the seat:
- pull the control 23 indicated with a red marking and hold it to tilt the seat to 45°;
- Guide the seat to the table position.
You can then remove the unlocked seat from the vehicle.
WARNING
For safety reasons, carry out any adjustments while the vehicle is stationary.
The rear seat is heavy. For your own safety, please handle it carefully.
To install seats
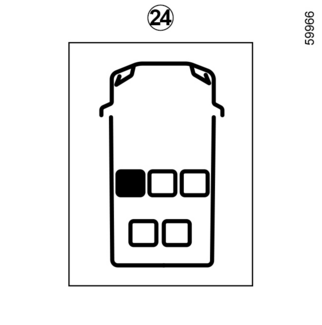
Before fitting a seat, check that it is in the correct position in the vehicle.
The information can be found on the label 24 located on the back of the seat.
The seats must not be swapped.
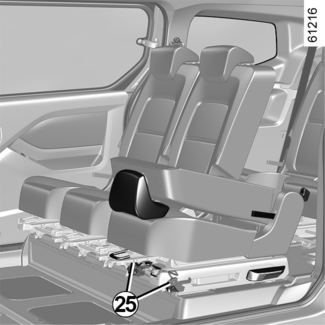
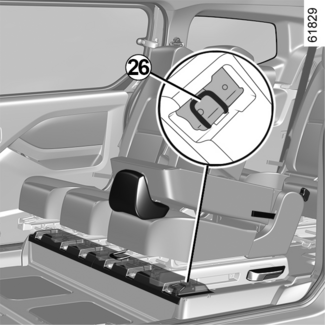
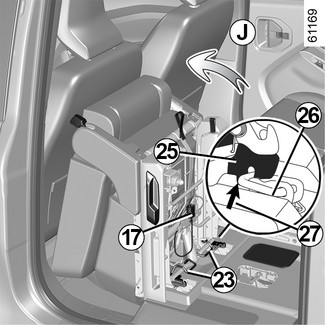
- Attach the hooks 25 to the anchorage point 26 marked with an arrow 27 by gently lifting the back of the seat;
- move the seat as far forward as possible (movement J);
- the control 23 locks, accompanied by a locking noise;
- connect the connector 17.
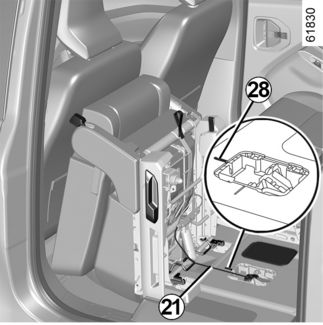
To connect the connector 17:
- remove the flap 20;
- disconnect the cable 21 from the connector on the clip 22;
- connect the connector 17 and lock the red tab 19;
- reposition the cable 21 in the carpet recess 28;
- refit the flap 20.
Tip
When refitting a seat in the vehicle, be sure to reconnect the seat connector. If
this is not the case, the seat belt buckle information will not be shown on the instrument
panel SEAT BELTS.
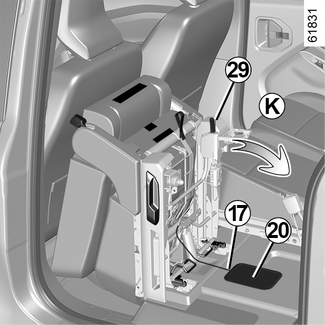
To place the seats in the position of use:
- pull the red strap 29 as far as it will go;
- lower the seat and guide it until it locks onto the floor (movement K).
Make sure the seat is correctly locked in position.
Raise the seatback (movement L).
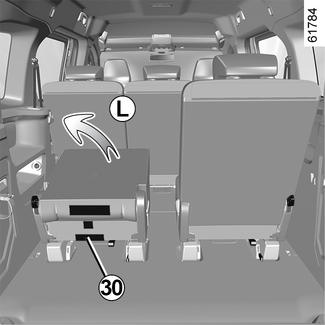
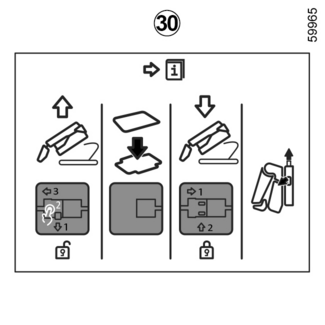
Tip
After refitting the connector 17 and closing the flap 20, it is essential to pull the red strap 29 before folding down the seat.
The label 30 located on the back of the seats reminds you of this.