CHANGING A WHEEL: hydraulic jack

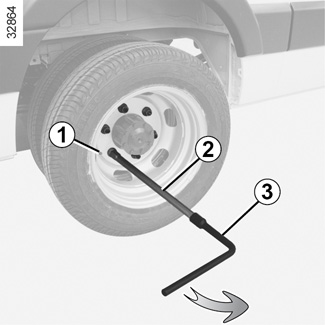
When removing dual wheels, unscrew inflating extension piece 1.
Do not forget to reattach it when refitting.
Undo the wheel bolts by fitting the wheel spanner 3 extended using the hexagonal extension piece 2 (supplied in the tool kit) and pressing down.
Anti-theft bolt
If you use anti-theft bolts, fit these nearest the valve (otherwise it may not be possible to fit the wheel trim).
If the vehicle is parked on the hard shoulder, you must warn other road users of your vehicle’s presence with a warning triangle or with other devices as per the legislation applying to the country you are in.
Switch on the hazard warning lights.
Keep the vehicle away from traffic and on a level surface where it will not slip.
Apply the parking brake and engage a gear (first or reverse, or N for sequential gearboxes).
Ask all the passengers to leave the vehicle and keep them away from traffic.


Take the jack 3 out of the tool kit. Familiarise yourself with the jack arrangement prior to using it.
Using the jack
Position the head of the jack on the contact points 2 close to the wheel concerned.
Place the jack 3 horizontally. The jack head must line up with the point 2 provided.
Begin to pump using the three extension pieces 4 available in the tool kit placed end-to-end (refer to the information on the “Tool kit” in section 5).
Free the wheel from the ground.
Note: the use of the three extension pieces 4 prevents you having to go under the vehicle to operate the jack 3 when raising the vehicle.
Remove the screws, then remove the wheel (take off the central wheel trim if necessary).
Fit the emergency spare wheel on the central hub and, depending on the vehicle, turn it to align the mounting holes in the wheel and the hub.
If bolts are supplied with the emergency spare wheel, only use these bolts for the emergency spare wheel.
To prevent any risk of injury or damage to the vehicle, raise the jack until the wheel you are replacing is a maximum of 3 centimetres off the ground.

Tighten the nuts and lower the jack.
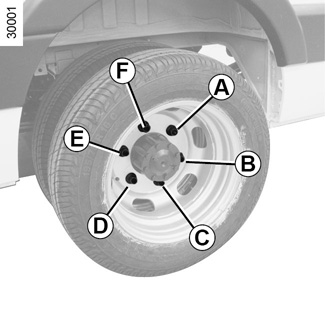
With the wheel on the ground, tighten the bolts completely, following the order of tightening below:
Wheel with 6 holes: start with screw A, then D, B, E, C and finish with F.

Wheel with 5 holes: start with screw G, then J, H, K and finish with I.
Have the tightening and the pressure of the spare wheel checked as soon as possible.