PUNCTURE, EMERGENCY SPARE WHEEL
In case of puncture
Depending on the vehicle, a tyre inflation kit or emergency spare wheel is provided (refer to the following pages).
Vehicle fitted with a tyre pressure monitoring system
In the event of under-inflation (punctures, under-inflation etc.), the warning light appears on the instrument panel. TYRE PRESSURE MONITORING SYSTEM.
If the vehicle is parked on the hard shoulder, you must warn other road users of your vehicle’s presence with a warning triangle or with other devices as per the legislation applying to the country you are in.
Do not leave the tools unsecured inside the vehicle as they may come loose under braking. After use, make sure the tools are correctly positioned in their mountings: risk of injury.
If bolts are supplied with the emergency spare wheel, you must use these bolts only for the emergency spare wheel.
The jack is designed for wheel changing purposes only. Under no circumstances should it be used for carrying out repairs underneath the vehicle or to gain access to the underside of the vehicle.
If the emergency spare wheel has been stored for several years, have it checked by your Dealer to ensure that it is safe to use.
Vehicle fitted with an emergency spare wheel that differs from the other wheels:
- Never fit more than one emergency spare wheel to the same vehicle.
- Replace the emergency spare wheel as soon as possible with a wheel identical to the original one.
- When this is fitted to the vehicle, which must only be a temporary measure, the driving speed must not exceed the speed indicated on the label on the wheel.
- Fitting an emergency spare wheel may alter the way the vehicle usually runs. Avoid sudden acceleration or deceleration and reduce your speed when cornering.
- If you need to use snow chains, fit the emergency spare wheel to the rear axle and check the tyre pressure.
Depending on the vehicle, there are 2 storage options for the emergency spare wheel:
- in a cradle under the floor at the rear of the vehicle;
- the floor at the rear of the vehicle.
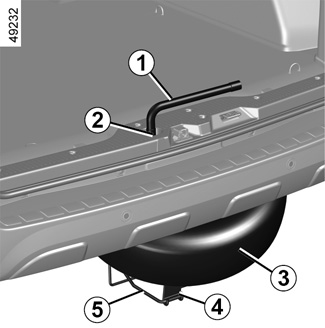
Emergency spare wheel 3
This is stored in cage 5 under the floor at the rear of the vehicle.
To access emergency spare wheel 3
- Open the boot lid;
- remove blanking cover 2;
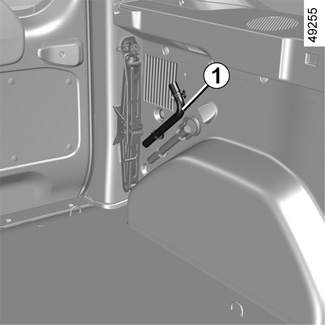
- undo screw with the wheelbrace 1 stored in the boot;
- unhook 5 cradle by taking it from hook 4;
- remove emergency spare wheel.
To store the wheel 3 in the cage
- Make sure you reposition the wheel in the cradle 5, valve pointing downwards;
- re-attach the cradle using handle 4 and retighten the nut using spanner 1 to refit the assembly and put blanking cover back in place;
- make sure you lock the cradle 5 back in place.
If the cradle 5 cannot be re-attached, this may mean that the wheel is not correctly positioned. If this happens, open the cage, push the wheel in as far as it will go and close again.
Do not touch the exhaust.
Risk of burns.
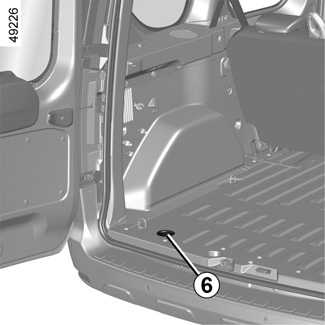
Emergency spare wheel 7
It is located under the floor at the rear of the vehicle. In the event of a puncture if your vehicle is fitted with a towbar and/or if the luggage compartment is loaded, to remove the emergency spare wheel from its winch you must lift the vehicle using a jack at the jacking point nearest the wheel.
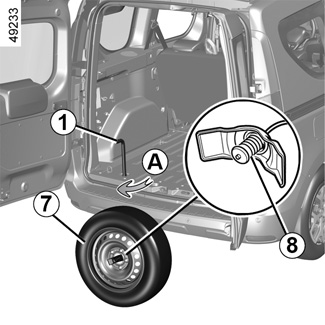
To access emergency spare wheel 7
- Open the boot lid;
- remove the blanking cover 6;
- only use the wheel brace 1 (using a different tool could damage the mechanism) to unroll the retaining cable. Unscrew the nut in a clockwise direction (movement A), and the wheel will lower to the ground;
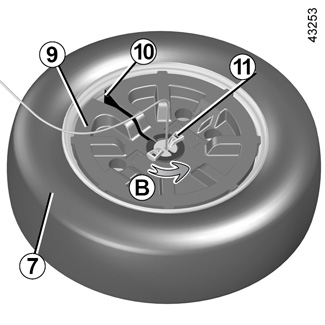
- from the outside of the vehicle, pull the wheel in order to access the handle 11;
- turn the handle 11 (movement B) in order to free the cable from the part 9;
- lift the part 9 from the wheel 7;
- remove the part 9 via the slot 10;
- stand the wheel up, pass the cable and the component 8 through the wheel rim and release the wheel.
Do not touch the exhaust.
Risk of burns.
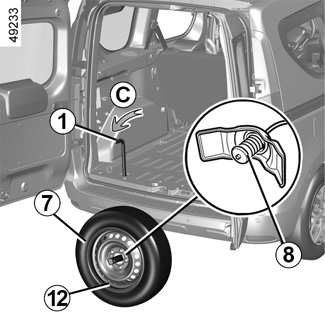
To refit the wheel 7
To carry out this operation, the cable must be unwound.
- Stand the wheel up with the valve 12 towards you.
- Thread the cable and the component 8 through the wheel rim.
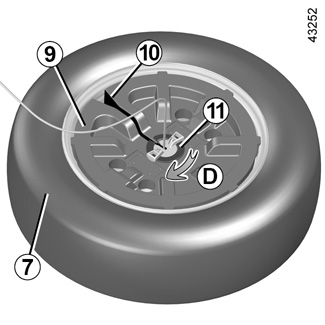
- Position wheel valve 12 towards the ground.
- Insert the cable in the slot 10 up to the centre of the part 9.
- Insert the part 9 into the wheel 7.
- Turn the handle 11 (movement D) to lock the cable.
From the luggage compartment, tighten the nut fully in an anti-clockwise direction (movement C) in order to wind up the retaining cable, ensuring that the wheel remains horizontal and the cable taut.
Final tightening must be carried out with the spanner 1 in the horizontal position.
Refit the 6 blanking cover.
As the punctured wheel is wider than the emergency spare wheel, when you place the punctured wheel in the emergency spare wheel bay, the vehicle’s ground clearance is reduced. To prevent damage, proceed carefully when driving over raised sections of road and when dismounting pavements When this is fitted to the vehicle, which must only be a temporary measure, the driving speed must not exceed the speed indicated on the label on the wheel.

SPARE WHEEL