AUTOMATIC CLIMATE CONTROL
Controls
(depending on vehicle)
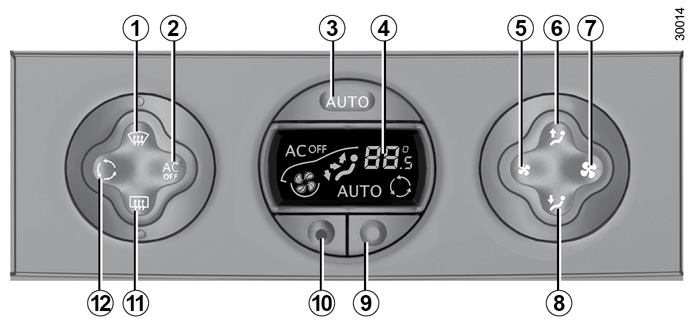
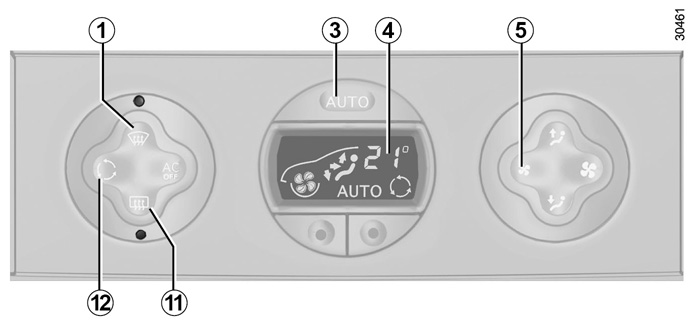
1 - “Clear View” button to demist and de-ice the windows.
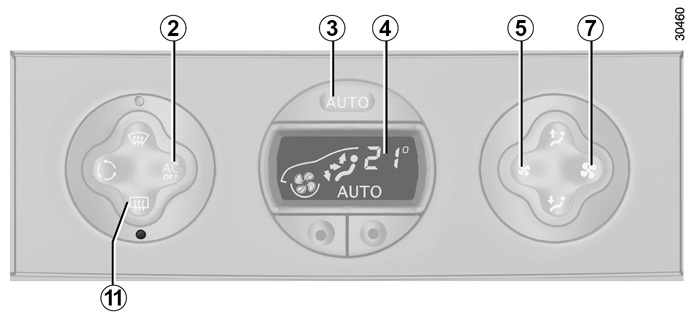
2 - Air conditioning off button.
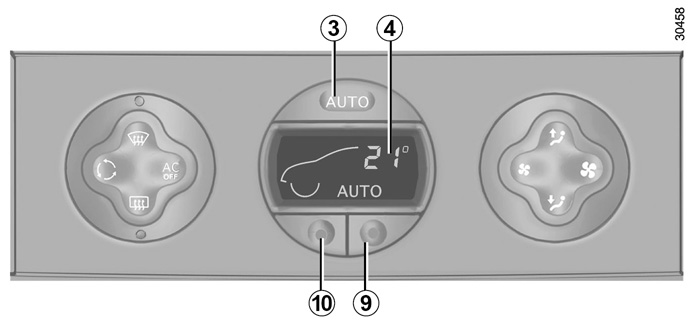
3 - Automatic mode.
4 - Display.
5 and 7 - Adjusting the ventilation speed.
6 and 8 - Passenger compartment air distribution adjustment.
9 and 10 - Adjusting the air temperature.
11 - Heated rear screen and/or heated door mirror de-icing.
12 - Air recirculation control.
Information and advice for use
Refer to information on “Air conditioning: information and advice on use”.
Automatic mode
Press button 3. AUTO lights up on display 4.
In most cases, the automatic climate control system ensures a comfortable temperature in the passenger compartment, while maintaining good visibility and optimising fuel consumption.
This is the recommended mode of use.
To reach and keep the chosen comfort level and to maintain good visibility, the system controls:
- ventilation speed;
- air distribution;
- air recirculation management;
- air conditioning start/stop;
- the air temperature.
Only the temperature and the AUTO symbol are displayed
Functions managed in automatic mode are not displayed.
- press button 9 to increase the temperature;
- press button 10 to decrease the temperature.
Note: The maximum and minimum settings of 15°C and 27°C allow the system to produce a minimum or maximum temperature, whatever the ambient conditions.
In automatic mode (AUTO lit on the display), all heating and air conditioning functions are controlled by the system.
When you modify certain functions, AUTO goes out. Only the modified function stops being controlled by the system.
Adjusting automatic mode
The system normally operates in automatic mode but you can alter the standard settings used by the system (air distribution, etc.). These options are explained on the following pages.
Automatic mode is the recommended mode of use
In most cases, the automatic climate control system ensures a comfortable temperature in the passenger compartment, while maintaining good visibility and optimising fuel consumption.
The types of adjustments that can be made are described in the following pages.
Return to automatic mode as soon as possible.
The displayed temperature values show a comfort level.
When starting the engine, increasing or decreasing the value displayed will not allow the comfort level to be reached any more quickly. The system will always optimise the temperature increase or decrease (the ventilation system does not start instantly at maximum speed: it gradually increases). This may take several minutes.
Generally speaking, unless there is a particular reason not to, the dashboard air vents should remain open.
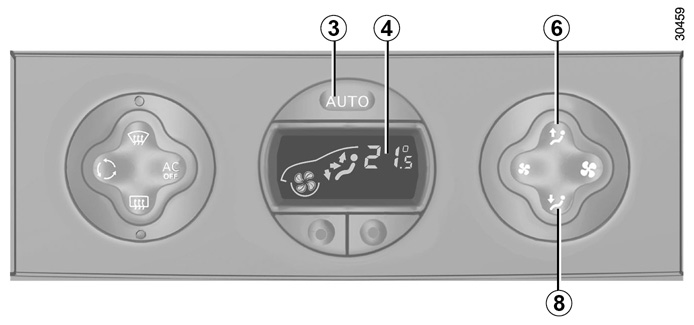
Distribution of air in the passenger compartment
There are five possible combinations for air distribution, which may be selected by pressing buttons 6 and 8 repeatedly. The arrows on display 4 indicate the setting selected:
õ The air flow is directed to the windscreen demisting vents and the side windows.
÷ The air flow is directed to the windscreen and side window demisting vents, and the passenger footwells.
ô The air flow is directed mainly to the dashboard air vents.
ö The air flow is directed towards all the air vents and the passenger footwells.
F The air flow is directed mainly towards the footwells.
The manual air distribution option causes the operating tell-tale light on display 4 to go out (automatic mode), but only air distribution is no longer controlled automatically by the system.
Press button 3 to return to automatic mode.
Switching air conditioning on or off
In automatic mode, the system switches the air conditioning system on or off, depending on the climate conditions.
Exit automatic mode by pressing button 2: AUTO goes out on display 4 and AC OFF lights up.
Note: the “Clear View” function automatically activates the air conditioning. Press button 3 to return to automatic mode.
Varying the ventilation speed
In automatic mode, the system uses the most suitable amount of air to reach and maintain the desired comfort level.
Exit automatic mode by pressing buttons 5 and 7.
These buttons allow you to increase or decrease ventilation speed.
Rear screen and/or door mirror de-icing/demisting.
Press button 11: the integrated indicator light comes on.
This function allows electric demisting of the rear screen and/or the electric heated door mirrors, depending on the vehicle.
To exit this function, press button 11 again. Demisting automatically stops by default.
In automatic mode, depending on the outside air conditions, the ventilation may not start immediately at maximum power but will increase progressively until the engine temperature is warm enough to heat the passenger compartment air. This may take from a few seconds to several minutes.
Clear View function
Press button 1; the indicator lights in buttons 1 and 11 come on.
AUTO goes out on display 4.
This function rapidly demists/de-ices the windscreen, the front side windows and the door mirrors.
It imposes automatic operation of the air conditioning and heating of the rear screen and/or heated door mirrors, and inhibits air recirculation.
Press button 11 if you do not wish to switch on the heated rear screen and/or heated door mirrors.
Note: if you wish to reduce the air flow (which may produce a certain amount of noise in the passenger compartment), press button 5.
To exit this function, press:
- button 1 again;
- button 3 (AUTO lights up on the display).
Air recirculation
Pressing button 12 activates air recirculation (the symbol lights up on the display).
During recirculation, air is taken from the passenger compartment and is recycled, with no air being taken from outside the vehicle.
Air recirculation allows the external atmosphere to be cut off (when driving in polluted areas, etc.).
Prolonged use of the air recirculation mode may cause the windows to mist up or lead to odours, as the air is not renewed.
We therefore advise you to return to normal mode (external air) as soon as the air recirculation function is no longer required, by pressing button 12 again.