EXTERIOR LIGHTING AND SIGNALS
u Side lights
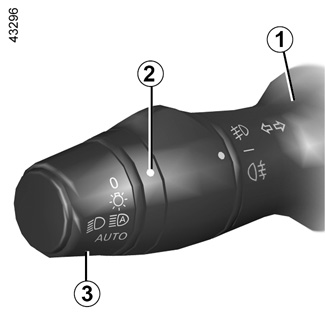
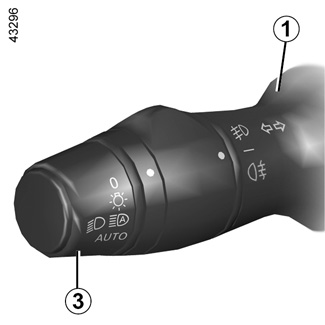
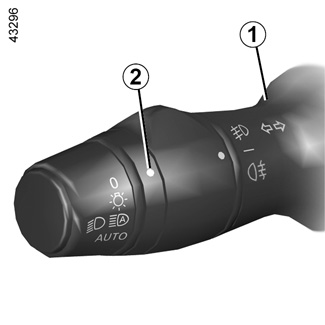
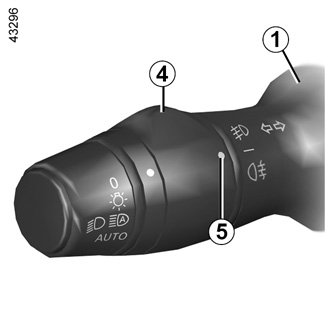
Turn ring 3 until the symbol is opposite mark 2.
The instrument panel will light up.
Side position lights
(depending on the vehicle)
These draw other road users’ attention to the width of the vehicle.
They come on when the side lights are switched on.
k Dipped beam headlights
Manual operation
Turn ring 3 until the symbol is opposite mark 2. This indicator light on the instrument panel comes on.
Automatic operation
(depending on vehicle)
Turn ring 3 until the AUTO symbol is opposite mark 2: with the engine running, the dipped beam headlights switch on or off automatically depending on the brightness of the light outside, without any action on stalk 1.
If the vehicle is parked on the hard shoulder with the tailgate open, the rear lights may be obscured. You should make other road users aware of your vehicle by using a warning triangle or other equipment specified by the road traffic regulations of the country you are driving in.
Before driving at night, check that the electrical equipment is operating correctly and adjust the headlight beams (if your vehicle is not carrying its normal load). In general, check that the lights are not obscured (by dirt, mud, snow or objects which could cover them).
Cornering lights
Depending on the vehicle, if the dipped beam headlights are on when cornering, and under certain driving conditions (speed, steering wheel angle, forwards gear selected, etc.), additional lights are switched on to light the inside of the bend.
Note: under certain conditions of prolonged use, this system will switch off automatically as it is intended for use over limited periods.
“See-me-home lighting” function
This function allows you to briefly switch on the dipped beam headlights (to provide light when opening a gate, etc.).
With the engine and lights off, and ring 3 in position 0, pull stalk 1 towards you: the dipped beam headlights come on for approximately one minute. To increase this duration, you may pull the stalk up to four times (total time limited to two minutes). To switch off the lights before they go out automatically, turn ring 3 to any position, then return it to position 0.
á Main beam headlights
With stalk 1 in dipped beam headlights position, move the stalk towards you.
When the main beam headlights are lit up, an indicator light on the instrument panel lights up.
To return to the dipped headlight position, pull stalk 1 towards you again.
Automatic main beam headlights
Depending on the vehicle, this system switches the main beam headlights on and off automatically. The function uses a camera located behind the interior rear-view mirror to detect vehicles that are following and coming in the opposite direction.
The main beam headlights come on automatically if:
- exterior light is weak;
- no other vehicles or lighting are detected;
- the vehicle speed is above approximately 30 mph (45 km/h).
If any of the above conditions are not fulfilled, the system switches to dipped beam headlights.
Activation/Deactivation
To activate automatic main beam headlights:
- Turn ring 3 until the AUTO symbol is opposite mark 2;
- Pull the stalk 1 towards you.
Warning light comes on the instrument panel.
To deactivate automatic main beam headlights:
- Pull the stalk 1 towards you again;
- or turn ring 3 to a position other than AUTO.
Warning light goes out on the instrument panel.
Automatic main beam headlights (continued)
Operating faults
When the message “CHECK LIGHTS” with warning light © is displayed and warning light k flashes on the instrument panel, this indicates that there is a lighting fault.
Consult an approved dealer.
g Front fog lights
Turn the centre ring 4 of the stalk 1 until the symbol is opposite the 5 mark.
The front fog lights only work if the exterior lights have been activated. An indicator light on the instrument panel will come on.
Using the portable navigation system at night in the windscreen area below the camera may disturb the operation of the “automatic main beam headlights” system (risk of reflection on the windscreen).
The system may encounter difficulties under certain conditions, including:
- extreme weather conditions (rain, snow, fog, etc.);
- obstruction in front of the windscreen or camera;
- when a following or oncoming vehicle has weak or hidden lighting;
- incorrect settings for the front headlights;
- reflective systems;
- ...
The “automatic main beam headlights” system should under no circumstances be used to replace driver attention and responsibility with regard to vehicle lighting and adapting to light, visibility and traffic conditions.
Rear fog lights
Turn the centre ring 4 of the stalk 1 until the symbol is opposite the 5 mark.
The rear fog lights only work if the exterior lights have been activated. An indicator light on the instrument panel will come on.
Do not forget to switch off the fog lights when they are no longer needed, to avoid inconveniencing other road users.
When the exterior vehicle lights are switched off, the rear fog lights switch off or the equipment returns to the front fog lights position (if they are fitted).
e Switching off the lights
There are two possibilities:
- manually, move ring 3 to position 0;
- automatically, the lights will go out when the engine is switched off, the driver’s door is opened or the vehicle is locked. In this case, the next time the engine is started the lights will be switched back on according to the position of the ring 3.
Lights-on warning buzzer
An audible warning sounds when the driver’s door is opened to indicate that the lights have been left switched on after the ignition has been switched off (to prevent discharge of the battery).
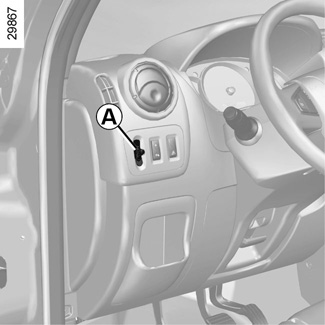
Electric beam height adjustment
Control A allows you to adjust the height of the headlight beams.
Turn control A to adjust the headlights according to the load.
This control only works when the lighting is in dipped beam headlight position.
Load status | Control position |
Empty, driver only | 0 |
Driver with passenger(s) and luggage compartment full (1) | 2 |
Other cases | According to driver’s judgement |
The table below gives some examples. In all cases, adjust control A according to the vehicle load so that the road can be seen and other drivers are not dazzled. | |