PUNCTURE, EMERGENCY SPARE WHEEL
In case of puncture
Depending on the vehicle, a tyre inflation kit or emergency spare wheel is provided (refer to the following pages).
Vehicle fitted with a tyre pressure loss warning system
In the event of underinflation (punctures, underinflation etc.), the warning light on the instrument panel comes on.
Please refer to the information on the “Tyre pressure loss warning” in Section 2.
If the vehicle is parked on the hard shoulder, you must warn other road users of your vehicle’s presence with a warning triangle or with other devices as per the legislation applying to the country you are in.
If the emergency spare wheel has been stored for several years, have it checked by your Dealer to ensure that it is safe to use.
Vehicle fitted with an emergency spare wheel that differs from the other wheels:
- Never fit more than one emergency spare wheel to the same vehicle.
- As the punctured wheel is wider than the emergency spare wheel, the vehicle’s ground clearance is reduced.
- Replace the emergency spare wheel as soon as possible with a wheel identical to the original one.
- When this is fitted to the vehicle, which must only be a temporary measure, the driving speed must not exceed the speed indicated on the label on the wheel.
- Fitting an emergency spare wheel may alter the way the vehicle usually runs. Avoid sudden acceleration or deceleration and reduce your speed when cornering.
- If you need to use snow chains, fit the emergency spare wheel to the rear axle and check the tyre pressure.
Emergency spare wheel
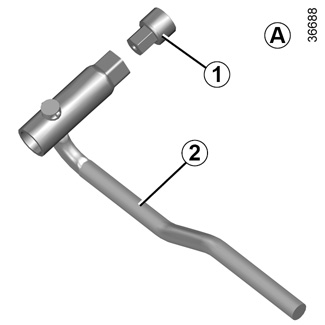
On equipped vehicles, use tool A, comprising:
- wheelbrace 2;
- for some versions, special end piece 1 (which must be added).
These components are stored in the tool kit.
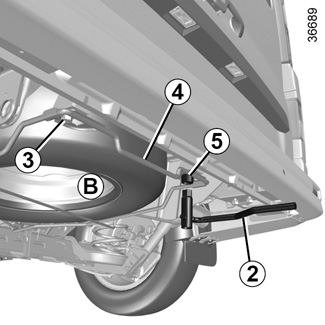
To take out emergency spare wheel B
Using the tool A, completely unscrew the nut 5 (right-hand side) and partially unscrew the nut 3 (left-hand side) until the notch of the wheel carrier 4 is released from the nut 3.
Move it up and down and from side to side to release the emergency spare wheel.
Depending on the vehicle, a note in the tool kit covers these instructions.
To refit emergency spare wheel B
Proceed in reverse order. Check that wheel carrier 4 is correctly positioned before tightening nuts 3 and 5.
In some cases (rear puncture, vehicle loaded with towing equipment etc.), it is necessary to raise the vehicle (using the lifting point nearest the wheel concerned) to permit access to the emergency spare wheel.
Do not touch the exhaust system.
Risk of burns.