Back to the list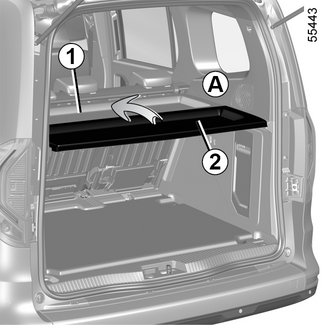

Luggage compartment storage
Luggage compartment storage
Rear parcel shelf
The shelf is made up of two rigid sections.
There are two possible positions:
- the upper position A;
In this case, you can fold section 2 onto section 1 by lifting it as shown by the arrow.
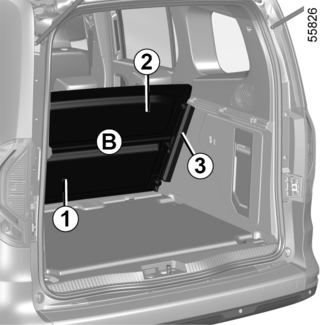
- Storage position B.
To store the parcel shelf, slide it into the runner 3 behind the rear bench seatback.
WARNING
Do not place any heavy or hard object on the parcel shelf. These may pose a risk to
the vehicle occupants if the driver has to brake suddenly or if the vehicle is involved
in an accident.
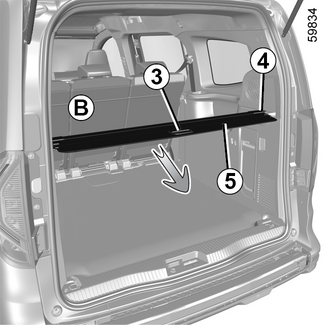
Luggage cover
To remove the flexible section of the luggage compartment cover
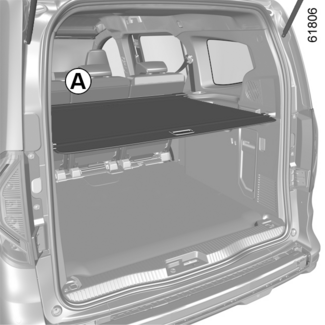
On equipped vehicles, it can be installed in two positions:
- behind the second-row seats (position A). In this case, the third row seats must either be in the table position, in the folded position or removed from the vehicle.
- behind the third-row seats (position B).
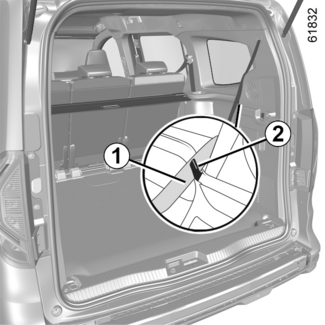
Ensure that each strap 1 is securely fixed in its tab 2.
Pull the handle 3 gently to release the pins 4 from their anchoring points 6 located on each side of the luggage compartment, then roll up the luggage cover 5.
Guide the winding movement of the luggage cover 5.
To roll out the flexible section of the luggage cover, proceed in the reverse order.
Tip
It is prohibited to fit the luggage cover behind the second row seats if there are
passengers on the third row seats.
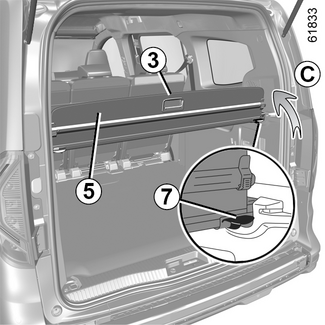
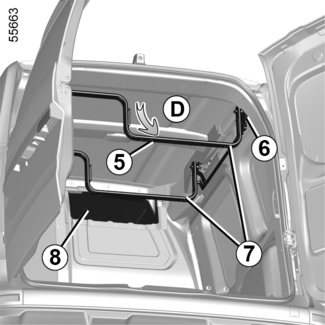
Removing the luggage cover
Using the handle 3, pivot the flexible section of the luggage cover 5 upwards (movement C) to access the stops 7 at the ends.
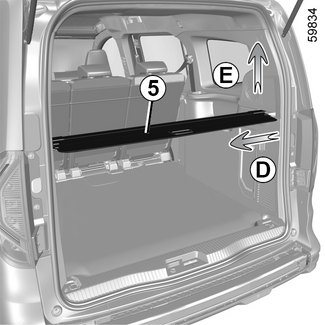
Push the right-hand stop 7 to the left (movement D) and lift the right-hand side (movement E) to remove the inertia reel from its housing.
Refitting the luggage compartment cover
Engage the left-hand side of the luggage cover 5, push the right-hand stop 7 towards the left and then lower the right-hand side of the inertia reel into its
housing.
WARNING
Do not place any heavy or solid objects on the luggage cover. These may pose a risk
to the vehicle occupants if the driver has to brake suddenly or if the vehicle is
involved in an accident.
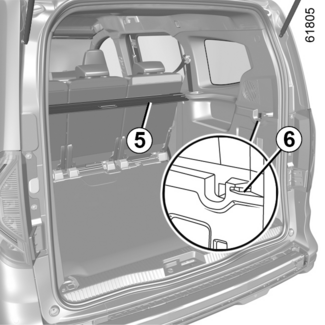
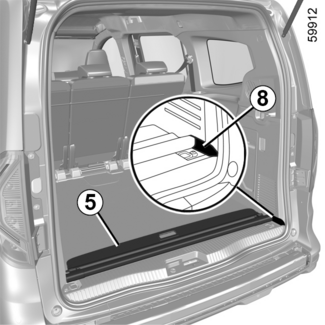
Luggage compartment cover storage
You can store the luggage cover 5 directly on the floor.
Position the inertia reel of the luggage cover 5 in the housings 8.
WARNING
No person or animal should be on the third row rear seats if the luggage compartment
cover is not removed.
Luggage compartment storage space and fittings
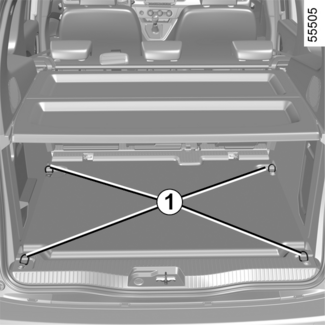
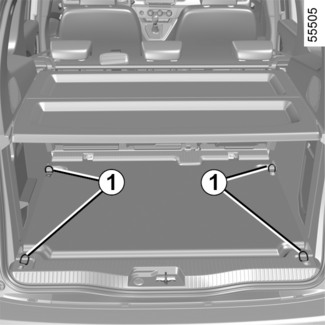
Anchorage points
Attachment points 1.
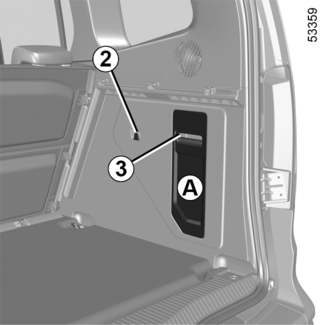
Bag hooks 2
Maximum weight per hook: 5 kg.
Storage compartment A
Unclip the flap 3.
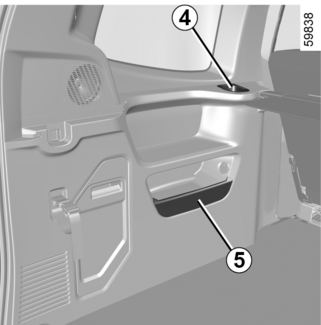
Cup holders 4
(depending on the vehicle)
Storage compartment 5
(depending on the vehicle)
WARNING
Ensure that no hard, heavy or pointed objects are placed in the "open" storage compartments
in such a way that they may be projected onto passengers during sudden turning, braking
or in the event of an accident.
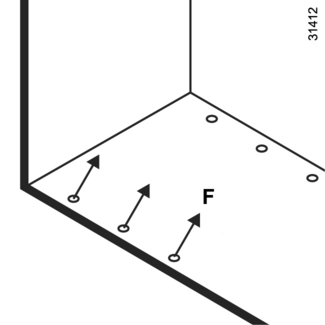
Transporting objects in the luggage compartment
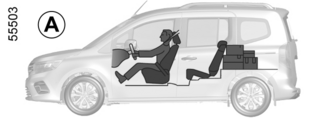
Always position the objects transported so that the largest surface is against:
the rear bench seatbacks, for normal loading (example A);
the front seatbacks with the rear seatbacks folded down, as is the case for maximum
loads (example B);
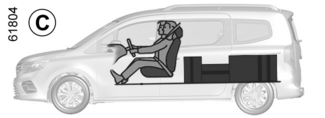
the front seatbacks when the second and/or third-row rear seats are in the folded
position or removed from the vehicle REAR SEATS: FUNCTIONS (case C).
Ensure that the objects being transported are evenly distributed throughout the loading
area.
If you have to place objects on the folded seat back, it is vital that you remove
the headrests before folding the seat back so that it can be folded as flat as possible
against the seat.
Tip
Heavy objects must not be transported on the rear seats when the seatbacks are folded
into the table position.
WARNING
Always position the heaviest items directly on the floor. If the vehicle is equipped,
use the lashing points 1 located on the luggage compartment floor. The luggage should be loaded in such a
way that no items will be thrown forward and strike the occupants if the driver has
to brake suddenly. Fasten the rear seat belts, even if the seats are not occupied.
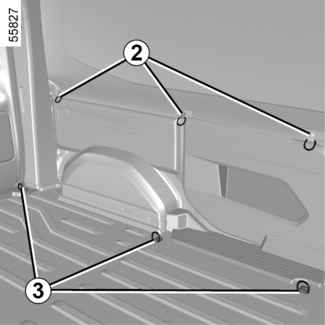
Transporting objects in the rear load area
Depending on the vehicle, rotating rings 2 and 3 can be used to prevent transported objects from moving. The number of rings and their
locations may vary depending on the vehicle.
Tip
The sole purpose of these rings 2 is to prevent transported objects from moving. The objects must be secured to the
mounting rings 3 on the vehicle floor beforehand.
Special note for van version
Rotary rings 3:
Fmax : 400 daN
WARNING
For your safety, check that all the vehicle’s doors are properly closed before starting
the engine.
WARNING
While driving with the right rear hinged door open, always secure transported loads.
The left-hand door, which remains shut, should not be used to hold transported loads
in place. Using the right rear hinged door open while driving should only be done
in exceptional cases.
In any event, please refer to local legislation.
Risk of loads falling on the road surface.
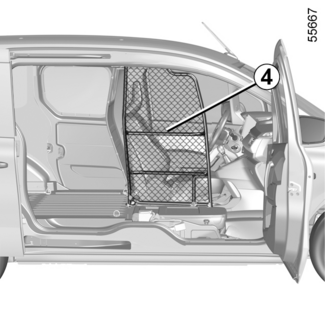
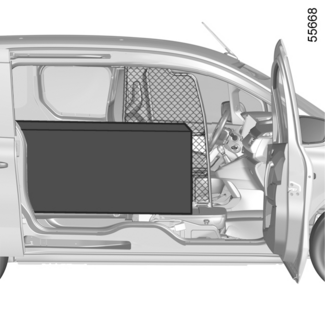
"Open Sesame" version
Depending on the width and length of objects carried in the rear load area, use the
front passenger door and sliding side door openings.
To do this, pivot the partition 4. Please observe the procedure when pivoting the partition SWIVELLING PARTITION.
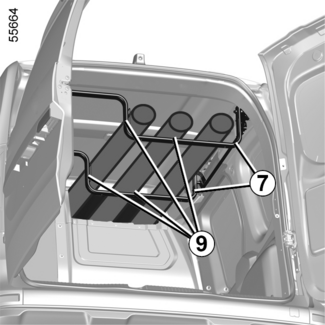
Recess 8 and roof rack 7
(depending on the vehicle)
Depending on the length of the objects being transported in the rear load area, you
can use the recess 8 or the roof rack 7.
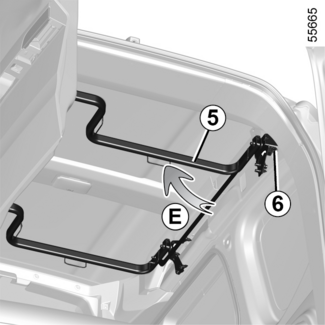
Position for use
With the roof rack in the storage position, pull the lever 6 downwards to unlock the roof rack, then hold the roof rack bar 5 and pull it towards you until it locks (movement D).
The roof rack locks automatically. Check that it is correctly locked.
Tip
Always secure transported loads using the rings 9.
Make sure that you abide by the maximum authorised length and load weight.
Prepare any protections that may be required and adapt your driving to minimise the
movement of the transported load and to avoid damaging the vehicle or the load.
Storage position
With the roof rack in the position of use, pull the lever 6 downwards to unlock the roof rack, hold the roof rack bar 5 and push it upwards until it locks (movement E).
The roof rack locks automatically. Check that it is correctly locked.
Tip
Maximum permissible load weight on roof rack 7: 30 kg evenly distributed.
Maximum load length:
- standard chassis: 2 metres;
- long chassis: 2.5 metres.
Tip
When handling the roof rack, ensure that nobody is near the moving parts.